

Quick answer: Once your doctor or midwife clears you to exercise, two full-body strength sessions a week is a realistic place to start after pregnancy. Use your bodyweight and light dumbbells. Begin each session with five minutes of breathing and pelvic floor work. Then do five simple moves for two sets, and build up slowly over 8 weeks.
This program is for you if you’ve had a baby, you’ve been cleared for exercise, and you want a clear plan instead of random workouts.
You may have already done the gentle first steps. If not, start with my postpartum strength training guide. It covers the early reconnection phase. This article picks up where that one ends, with an 8-week, two-day plan and a demo video for every exercise.
Why two days? It fits real life with a newborn. It also matches U.S. guidelines, which ask adults to do muscle-strengthening activity on two or more days a week (Piercy et al., 2018).
And what’s the goal here? Not “bouncing back.” The goal is to carry your baby, the car seat and the stroller with confidence, without leaking or back pain.
Before you start
Get cleared first. Mayo Clinic says that after an uncomplicated pregnancy and vaginal birth, it’s generally safe to start exercising a few days after birth, or once you feel ready. After a cesarean, extensive vaginal repair or a complicated birth, talk to your healthcare provider before you start a program (Mayo Clinic). The CDC also advises checking with your doctor about how to adjust your activity after pregnancy (CDC).
Consider a pelvic floor physical therapist. If you notice leaking, heaviness, pain or a bulging feeling, get assessed before you add weight. A specialist can check what your pelvic floor needs. I can’t do that through a screen, and neither can an app.
Stop and call your provider if you notice:
- Vaginal bleeding that isn’t your period, or bleeding that gets heavier with activity
- Leaking urine or stool during exercise
- Pelvic pressure or heaviness
- Pain at your cesarean scar, or cesarean symptoms that get worse with exercise
- Dizziness, chest pain or trouble breathing
- Calf pain or swelling
- Severe belly pain or extreme tiredness
Most of this list comes from an international expert consensus on postpartum exercise screening (Davenport et al., 2025). I’ve added leaking and pelvic heaviness from my own coaching. I treat them as signs to scale back, not to push through.
How the program works
You train two days a week, Day A and Day B, with at least two days between them. Monday and Thursday works well. So does Tuesday and Saturday.
| What | Details |
|---|---|
| Session length | 30 to 35 minutes, including a 5-minute warm-up |
| Equipment | A pair of light dumbbells, a sturdy step or bench, a mat, a kitchen counter or wall |
| Effort | Stop each set when you could still do 3 or 4 more good reps |
| Rest | 60 to 90 seconds between sets |
| Breathing | Breathe out as you lift, push or stand up. Don’t hold your breath |
Not sure which dumbbells to use? Pick a weight you can lift for the top of the rep range with good form and a few reps to spare. That might be 5 lb for a press and 15 lb for a squat. Everyone starts somewhere different.
What if the baby wakes halfway through? Stop there. A half session still counts. I’d rather you do 15 minutes twice a week for all 8 weeks than one perfect hour and then nothing.
Warm-up: reconnect your core and pelvic floor (5 minutes)
Do this at the start of both sessions. You can also do it on its own on other days.
- Belly and rib breathing (5 breaths). Lie on your back with your knees bent. Breathe in so your ribs and belly widen. Breathe all the way out.
- Connection breath (10 breaths). As you breathe out, gently lift your pelvic floor and draw your lower belly in. As you breathe in, let everything relax.
- Pelvic floor squeezes. Squeeze as if you’re stopping the flow of urine. Mayo Clinic suggests holding for up to 10 seconds, then relaxing for 10 seconds, for at least three sets of 10 a day (Mayo Clinic). Don’t practice them while you’re actually urinating.
The relax part matters as much as the squeeze. If you can’t feel a full release, mention it to your provider.
What the research says. A 2020 Cochrane review of 46 trials found that pelvic floor training during pregnancy may help prevent leaking later on. For training started after birth, the effect on leaking was less certain. The reviewers thought targeted programs might work better than general advice (Woodley et al., 2020). So if you have symptoms, a personal assessment beats guessing.
Day A: squat, push and row
| Exercise | Sets | Reps | Rest |
|---|---|---|---|
| 1. Glute bridge | 2 to 3 | 10 to 12 | 60 sec |
| 2. Dumbbell goblet squat | 2 to 3 | 8 to 10 | 90 sec |
| 3. Elevated press-up | 2 to 3 | 6 to 10 | 60 sec |
| 4. Dumbbell single-arm row | 2 to 3 | 8 to 10 each side | 60 sec |
| 5. Dead bug | 2 | 5 to 6 each side | 60 sec |
1. Glute bridge
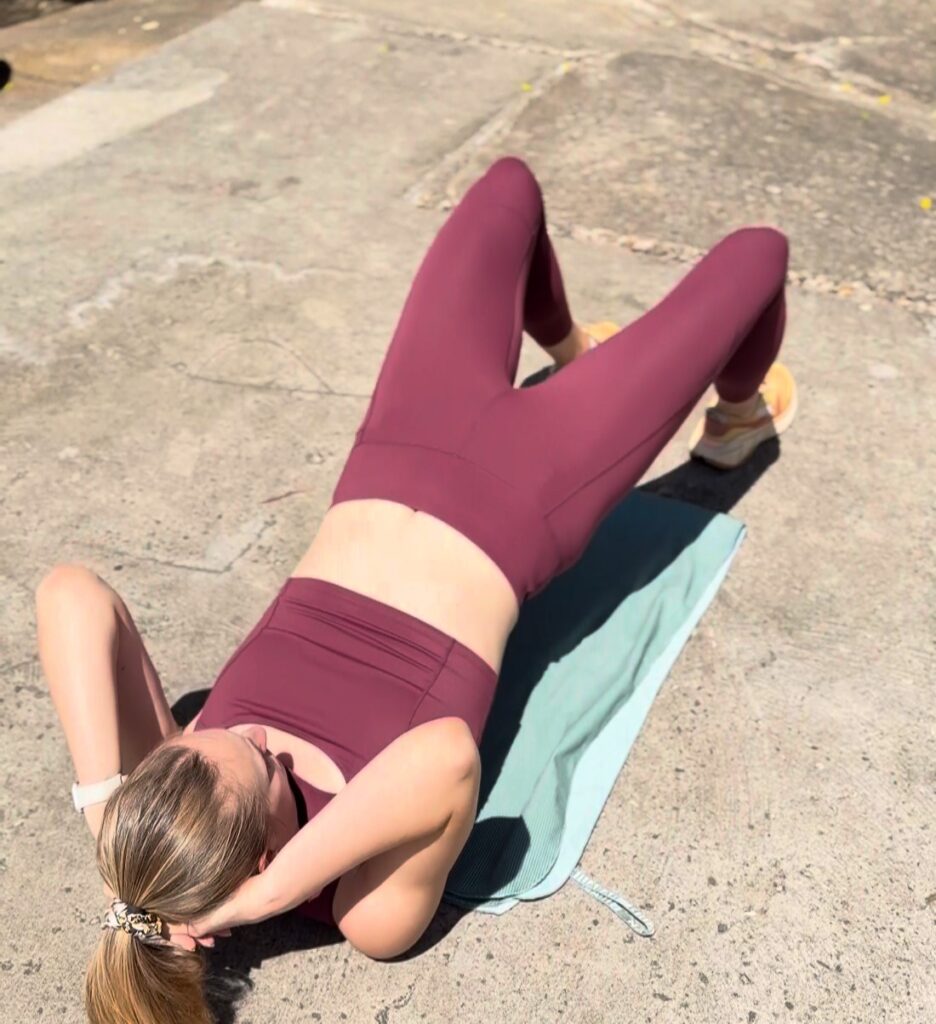
Lie on your back with your knees bent and feet hip-width apart. Breathe out, gently lift your pelvic floor and press through your heels. Lift your hips until your shoulders, hips and knees form a line. Pause for one second, then lower slowly.
- Cue: Squeeze your glutes at the top, not your lower back.
- Common mistake: Arching your back to get higher.
- Make it harder: Rest a dumbbell across your hips, as in the video.
2. Dumbbell goblet squat
Hold one dumbbell upright against your chest. Stand with your feet about shoulder-width apart. Sit down between your heels as far as feels comfortable, then stand back up.
- Cue: Breathe out as you stand.
- Common mistake: Letting your knees cave in.
- Make it easier: Squat down to a chair and stand back up.
For more detail, read my goblet squat guide.
3. Elevated press-up
Place your hands on a kitchen counter, bench or sturdy step, a little wider than your shoulders. Walk your feet back until your body is in a straight line. Lower your chest to the edge, then push away.
- Cue: Keep your ribs and hips moving together.
- Common mistake: Letting your hips sag or your belly push out. If that happens, raise your hands higher.
- Make it easier: Do the knee version, shown in the second video.
4. Dumbbell single-arm row
Put one hand on a bench and step back into a split stance. Hold a dumbbell in your other hand. Pull it up toward your hip, then lower it slowly.
- Cue: Think about driving your elbow toward your back pocket.
- Common mistake: Twisting your body to swing the weight up.
- Why it helps: Feeding and carrying pull your shoulders forward. Rows train the muscles that hold them back.
5. Dead bug
Lie on your back with your arms pointing up and your knees bent at 90 degrees above your hips. Breathe out and slowly reach one arm back while you lower the opposite leg. Keep your lower back gently touching the floor. Return and switch sides.
- Cue: Move slowly. Breathe out on every reach.
- Common mistake: Your belly domes or your back arches. Make the movement smaller.
- Make it easier: Keep your arms still and lower one heel to tap the floor.
Full walkthrough: How to do a dead bug
Day B: hinge, step, press and carry
| Exercise | Sets | Reps | Rest |
|---|---|---|---|
| 1. Dumbbell Romanian deadlift | 2 to 3 | 8 to 10 | 90 sec |
| 2. Bodyweight step-up | 2 to 3 | 6 to 8 each leg | 60 sec |
| 3. Seated dumbbell shoulder press | 2 to 3 | 8 to 10 | 60 sec |
| 4. Dumbbell bent-over row | 2 to 3 | 8 to 10 | 60 sec |
| 5. Dumbbell farmer’s carry | 2 to 3 | 20 to 30 seconds | 60 sec |
1. Dumbbell Romanian deadlift (RDL)
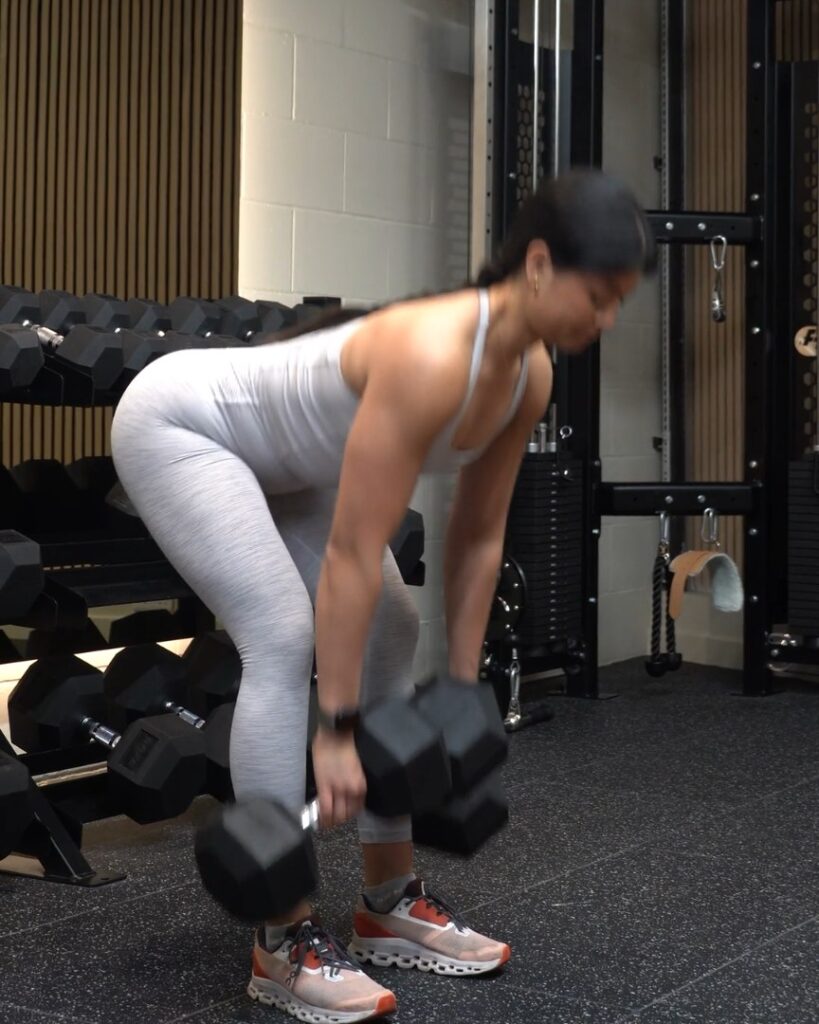
Hold a dumbbell in each hand in front of your thighs. Soften your knees. Push your hips back and slide the weights down your thighs, keeping your back flat. Go as low as you can without your back rounding, often to just below the knee. Squeeze your glutes to stand up.
- Cue: Hips back, as if you’re closing a car door with your butt.
- Common mistake: Bending your knees too much, so it turns into a squat.
More detail: RDL form guide
2. Bodyweight step-up
Use a low step to start, around 6 to 12 inches high. Place your whole foot on it. Push through that foot to stand up, then step down with control. Hold a wall or railing for balance at first.
- Cue: Let the top leg do the work.
- Common mistake: Pushing off hard with the back foot.
3. Seated dumbbell shoulder press
Sit on a bench with back support. Hold the dumbbells at shoulder height, palms facing forward. Breathe out and press them overhead, then lower slowly.
- Cue: Keep your ribs down and your back against the pad.
- Common mistake: Leaning back and arching to finish the rep. Use lighter dumbbells instead.
4. Dumbbell bent-over row
Hold a dumbbell in each hand. Hinge forward from your hips with a flat back. Row both dumbbells toward your lower ribs, then lower them slowly.
- Cue: Squeeze your shoulder blades together at the top.
- Common mistake: Standing up a little more with every rep.
- Option: If holding the hinge tires your back, do the single-arm row from Day A instead.
5. Dumbbell farmer’s carry
Pick up a dumbbell in each hand the same way you start an RDL. Stand tall and walk with short, steady steps for 20 to 30 seconds.
- Cue: Stand tall with your ribs stacked over your hips. Breathe normally.
- Common mistake: Leaning to one side or shrugging your shoulders.
- Why it helps: It’s the closest exercise to carrying a car seat or a bag of groceries.
More detail: farmer’s carry guide
How to progress over 8 weeks
| Weeks | Sets | What changes |
|---|---|---|
| 1 to 3 | 2 | Learn the moves. Use bodyweight or your lightest dumbbells. Stop with 3 or 4 reps to spare. |
| 4 to 6 | 3 | Add a third set. When you hit the top of the rep range for two sessions in a row, go up one dumbbell size. |
| 7 to 8 | 3 | Lower each rep over 3 seconds. Try harder versions: press-ups from the floor, reverse lunges instead of step-ups, and a side plank from your knees after the dead bug. |
After week 8, you can run the plan again with heavier dumbbells. Or you can move on to a longer program.
My rule is simple. Only move up when you have no symptoms during the session or the day after. If leaking, heaviness or doming shows up, go back a step and stay there for a week or two.
Running and jumping aren’t part of this plan. Returning to impact is its own step. Ask your provider or pelvic floor physical therapist when you’re ready for it.
What about the gap in my abs?
A gap between the two sides of the six-pack muscle is called diastasis recti. It’s very common. In one study of 300 first-time mothers, 60% had it at 6 weeks after birth and 33% still had it at 12 months (Sperstad et al., 2016).
Can exercise close it? The evidence says probably not on its own. A 2026 review found no evidence that exercise alone reduces the gap (Lyons et al., 2026). But a 2023 trial found that 12 weeks of curl-ups made abdominal muscles stronger without making the gap worse (Gluppe et al., 2023).
So in my coaching, I focus on strength and control rather than the width of the gap. If your belly domes during an exercise, make it easier and try again later.
Will this build lean muscle?
It will build strength, and that’s what you’ll notice first. In one trial, 60 postpartum women did resistance training twice a week for 18 weeks. Their bench press strength rose 36% and their leg press strength rose 31%. A stretching group improved by 8% and 7%. Body composition didn’t differ between the groups (LeCheminant et al., 2014).
In other words, strength comes quickly. Visible changes in muscle take longer. They depend on sleep, food and months of steady training. Give it time.
Summary
- Get cleared by your provider first. See a pelvic floor physical therapist if you have symptoms.
- Train two days a week with bodyweight and light dumbbells.
- Start every session with five minutes of breathing and pelvic floor work.
- Day A: glute bridge, goblet squat, elevated press-up, single-arm row, dead bug.
- Day B: RDL, step-up, seated shoulder press, bent-over row, farmer’s carry.
- Follow the plan for 8 weeks. Do 2 sets in weeks 1 to 3, then 3 sets. Only move up when you have no symptoms.
Train this plan with 12REPS
It helps to have the plan with you when you train. In the 12REPS app, every exercise has two demo videos, and your gym log shows what you lifted last time. A rest timer keeps your sessions on track. You can set up Day A and Day B in Build Your Routine. When your 8 weeks are done, you can follow one of the trainer-built 6 to 12 week programs. New users get a 7-day free trial.
Download 12REPS and see what you’ll get:
Sources
- Piercy KL et al. The Physical Activity Guidelines for Americans. JAMA, 2018
- CDC. Pregnant and Postpartum Activity: An Overview
- Mayo Clinic. Exercise after pregnancy: How to get started
- Davenport MH et al. Prescreening and contraindications for postpartum physical activity: an international Delphi study. Br J Sports Med, 2025
- Woodley SJ et al. Pelvic floor muscle training for preventing and treating incontinence in antenatal and postnatal women. Cochrane Database Syst Rev, 2020
- Sperstad JB et al. Diastasis recti abdominis during pregnancy and 12 months after childbirth. Br J Sports Med, 2016
- Lyons G et al. Abdominal and pelvic floor muscle training to treat diastasis recti abdominis postpartum: an updated systematic review. Hernia, 2026
- Gluppe SB et al. Curl-up exercises in women with diastasis recti abdominis postpartum: a randomized controlled trial. J Physiother, 2023
- LeCheminant JD et al. Effect of resistance training on body composition, self-efficacy, depression, and activity in postpartum women. Scand J Med Sci Sports, 2014
Related reading
- Postpartum strength training: a safe return to exercise after pregnancy
- How to do a dead bug
- How to do a goblet squat
- How to do a farmer’s carry
- Romanian deadlift (RDL) form guide
I’m Will Duru, a personal trainer and the founder of 12REPS. I hold a BSc (Hons) in Sport and Exercise Science and have more than a decade of experience coaching people in strength training.