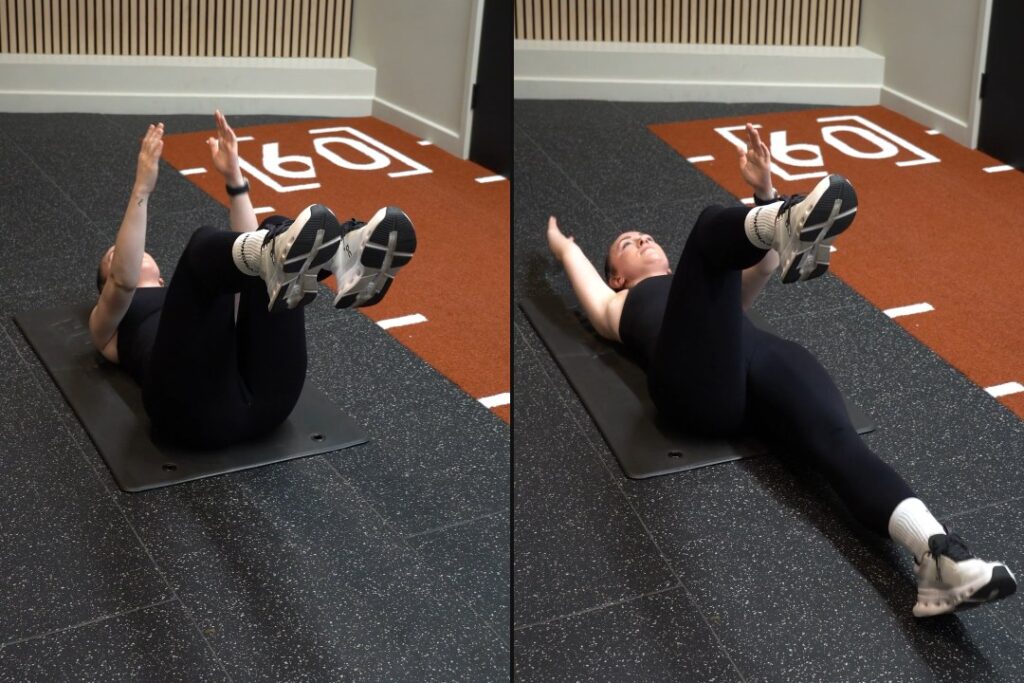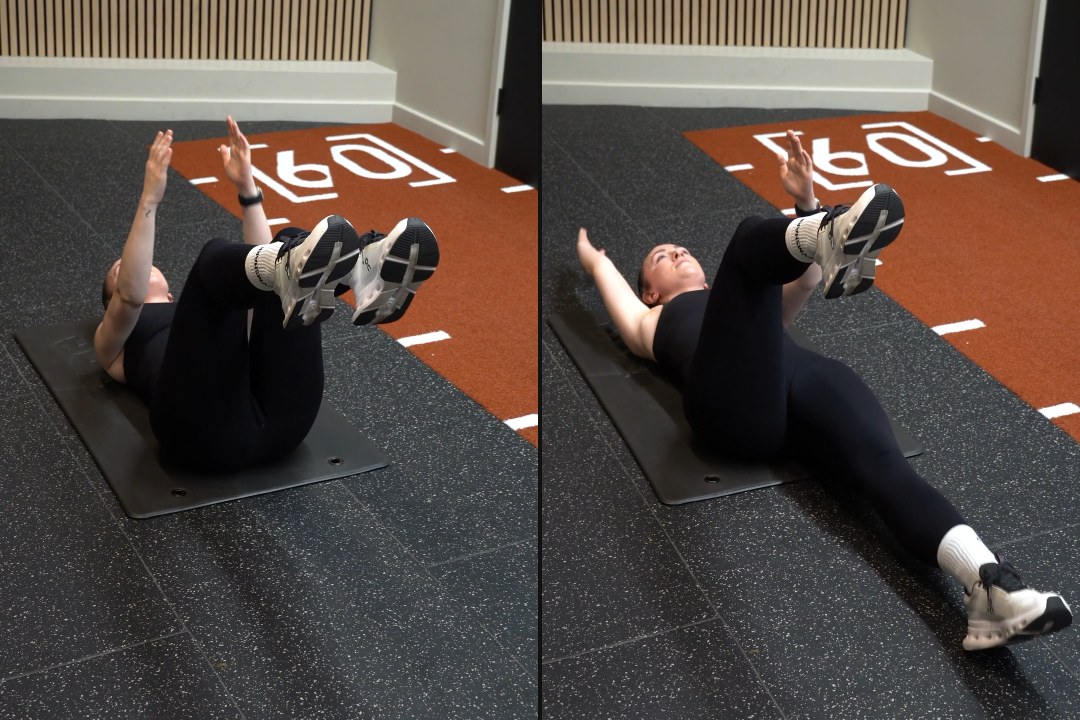



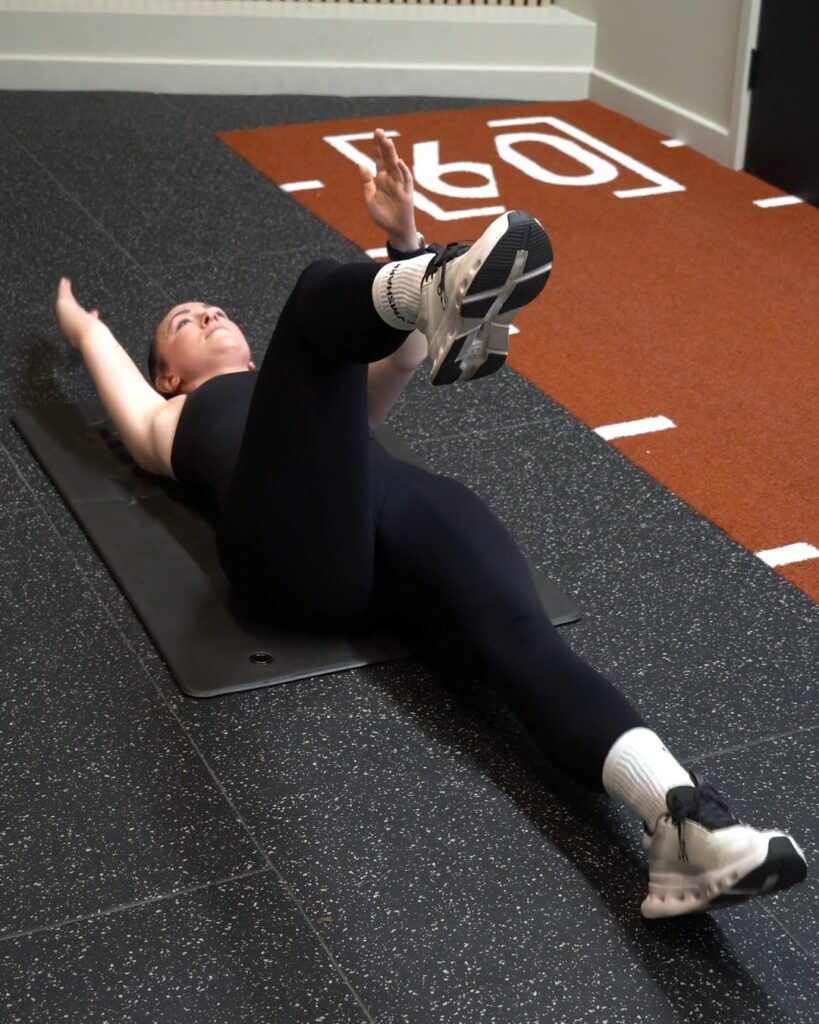
To do a dead bug, lie on your back with your arms reaching to the ceiling and your knees bent at 90 degrees above your hips. Press your lower back into the floor. Slowly lower your right arm overhead and your left leg toward the floor, then bring them back and switch sides. Your lower back stays flat the whole time.
That’s the move. The hard part is doing it slowly.
The dead bug is the core exercise I give most beginners first. It teaches your deep core muscles to brace while your arms and legs move, without putting stress on your back.
This guide is for you if:
- You’re new to core training and want a safe place to start.
- Planks or sit-ups bother your lower back.
- You want to learn how to brace properly for squats and deadlifts.
I’m Will Duru, a personal trainer and the founder of 12REPS. Below, I’ll cover what the research shows, how to set up and move, how many reps to do, easier and harder versions and the mistakes I see most.
Why do dead bugs?
The dead bug is an anti-extension exercise. As your arm and leg move away from you, your lower back wants to arch off the floor. Your core’s job is to stop it. That’s the same skill you need to keep your spine steady when you squat, deadlift or carry something heavy.
What the research says
- It mainly works your abs, and gets harder as you extend. In a lab study of 12 healthy adults, the dead bug mostly worked the abdominal muscles. Their activity rose as the version got harder. (Souza et al., 2001)
- It’s a control exercise, not a big strength builder. The same study found muscle activity stayed below 41% of a maximal effort. The researchers suggested that’s probably not enough on its own to build strength. That’s why I use it to teach bracing, alongside heavier exercises.
- Exercise helps chronic low back pain, but no single type is best. A review of 29 trials found exercises that focus on deep core control, like the dead bug, gave similar results to other types of exercise for chronic low back pain. The authors said the choice should depend on preference, cost and safety. (Saragiotto et al., 2016)
What the research doesn’t say
- The muscle studies were small and done in healthy people.
- One small study in 30 healthy women found the bird dog worked some deep core muscles harder than the dead bug in certain positions. Both have a place. (Emami et al., 2015)
If you have back pain, check with a doctor or physical therapist before you start.
Why I use them
The dead bug teaches your deep core muscles to fire properly, without putting any stress on your back. It’s the foundational core stability exercise. You learn to brace while your arms and legs work independently, which helps in every other lift.
It’s also one of the few core exercises I’m happy to give almost anyone, from complete beginners to people returning to exercise after having a baby.
How to do a dead bug
Setup
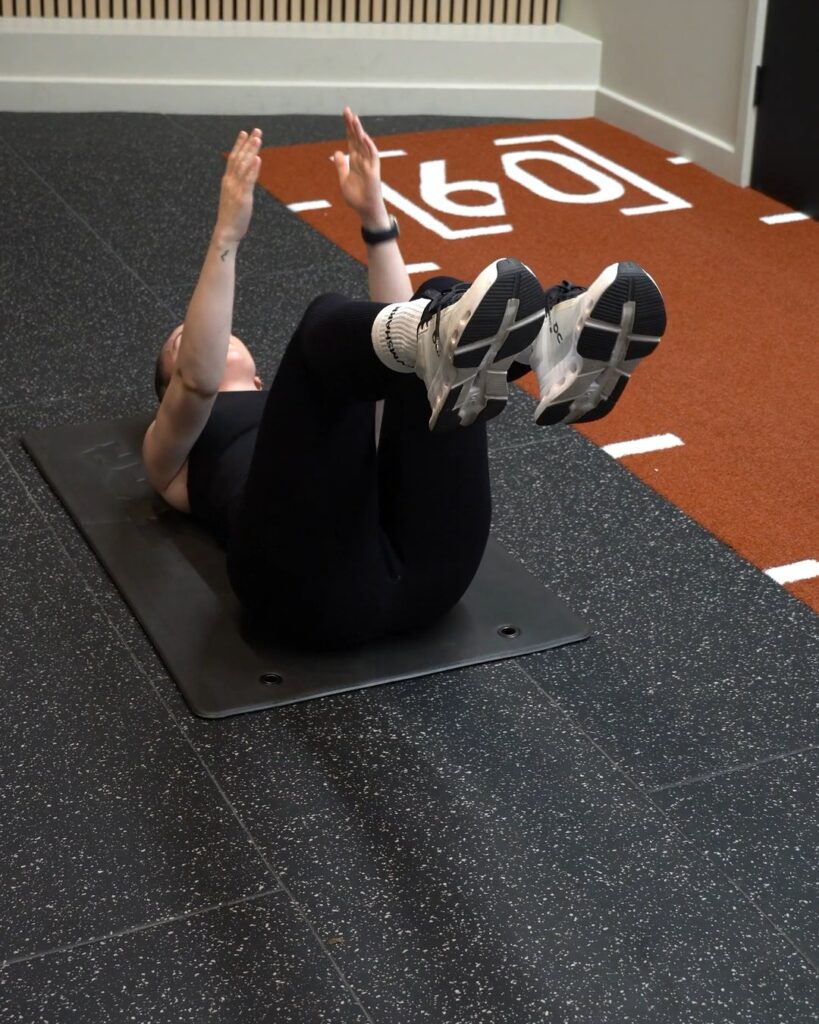
- Lie on your back on a mat. Arms reaching straight up toward the ceiling, hands above your shoulders.
- Lift your legs. Bend your knees to 90 degrees, with your knees directly above your hips and your shins parallel to the floor.
- Flatten your lower back. Gently press it into the floor. You shouldn’t be able to slide a hand underneath.
- Brace. Breathe out and tighten your stomach as if you’re about to be poked.
The movement
- Lower one arm and the opposite leg. Slowly reach your right arm back over your head and straighten your left leg toward the floor. Take about 3 seconds.
- Stop before your back moves. Go only as low as you can while your lower back stays pressed into the floor. Hover just above the floor if you can.
- Return to the start. Bring your arm and leg back slowly.
- Switch sides. Now lower your left arm and right leg. That’s one rep on each side.
Breathing
Breathe out slowly as you lower your arm and leg. This helps you keep your ribs down and your back flat. Breathe in as you bring them back.
My coaching cues
- “Back stays glued to the floor.” If it lifts, you’ve gone too far.
- “Slow is the point.” Move with control. Speed hides mistakes.
- “Opposite arm, opposite leg.” Right arm with left leg, then switch.
- “Breathe out as you reach.” It keeps your ribs down and your core tight.
Sets and reps
Dead bugs are about quality, not volume. Stop each set when your lower back starts to lift.
| Level | Sets | Reps | Rest |
|---|---|---|---|
| Beginner or returning after pregnancy | 2 | 8 each side | 45 sec |
| Building up | 3 | 8 to 10 each side | 45 to 60 sec |
| Confident | 3 | 10 each side, slower | 45 to 60 sec |
Do dead bugs two or three times a week. They work well in a warm-up or at the end of a session.
How to progress
- Slow down. Take 3 to 4 seconds to lower and pause for a second at the bottom.
- Reach further. Straighten your leg fully and lower it closer to the floor, keeping your back flat.
- Add a band or weight. Try one of the harder versions below.
Easier dead bug variations
Start here if your lower back lifts as soon as you move.
- Arms only. Keep your knees at 90 degrees and lower one arm at a time.
- Legs only. Keep your arms pointing at the ceiling and lower one leg at a time.
- Heel taps. Keep your knee bent and tap your heel to the floor, instead of straightening your leg.
When you can do 10 slow reps each side with your back flat, move on to the full dead bug.
Harder dead bug variations
- Banded dead bug. Loop a resistance band around a sturdy anchor behind your head and hold it with both hands, arms straight. Keep tension on the band as your legs move. Your core has to work harder to stay still.
- Weighted dead bug. Hold a light dumbbell or kettlebell straight above your chest with both hands while you lower your legs one at a time.
- Long-lever dead bug. Start with both legs straight, raised toward the ceiling, and lower one at a time. Only try this if your back stays flat.
Pair it with the bird dog
The bird dog is the dead bug’s opposite. You’re on your hands and knees instead of your back, and you reach one arm forward and the opposite leg back. It trains your back extensors and glutes more, while the dead bug trains your abs more. I often use both in the same program.
Common dead bug mistakes
The biggest one is letting your lower back lift off the floor. Once that happens, your core has stopped doing its job.
| Mistake | What it looks like | The fix |
|---|---|---|
| Lower back arching | A gap appears between your back and the floor | Don’t lower as far. Breathe out and press your back down |
| Moving too fast | Arms and legs drop and swing back quickly | Take about 3 seconds to lower and 3 to return |
| Same arm and leg | Right arm moves with right leg | Use opposite arm and opposite leg |
| Holding your breath | Face tightens, you gasp between reps | Breathe out as you lower, in as you return |
| Knees drifting | Knees move toward your chest or away from your hips | Keep the resting knee stacked over your hip |
| Neck straining | Head lifts, chin pokes forward | Rest your head on the floor and keep your neck relaxed |
If you feel it in your lower back, shorten the movement or go back to an easier version.
Where dead bugs fit in your training
You can use dead bugs in two ways:
- In your warm-up. One set of 8 each side wakes up your core before squats and deadlifts.
- At the end of a session. As part of a short core finisher. In my programs, I often pair the dead bug with a plank.
Here’s a simple core pairing:
| Exercise | Sets | Reps or time | Rest |
|---|---|---|---|
| A. Dead bug | 3 | 10 each side | None, go straight to B |
| B. Plank | 3 | 30 to 45 seconds | 45 sec, then repeat |
Summary
- Lie on your back, arms up, knees at 90 degrees above your hips.
- Press your lower back into the floor and keep it there.
- Slowly lower your opposite arm and leg, then switch.
- Breathe out as you lower.
- Start with 2 to 3 sets of 8 to 10 each side.
- Stop the set when your back starts to lift.
Train your core with a plan
Core work is easy to forget. It’s usually last on the list, and the first thing you skip.
12REPS gives you a plan to follow, so you know exactly what to do each session. Every program is written by a real personal trainer. Before every exercise, you get a demo video and a coach’s guide, so you know exactly what good form looks like. Every set you log is saved, so you can see your training build week by week.
Download 12REPS and see what you’ll get:
Sources
- Souza GM, Baker LL, Powers CM. Electromyographic activity of selected trunk muscles during dynamic spine stabilization exercises. Archives of Physical Medicine and Rehabilitation. 2001;82(11):1551–1557.
- Saragiotto BT, Maher CG, Yamato TP, et al. Motor control exercise for chronic non-specific low-back pain. Cochrane Database of Systematic Reviews. 2016;(1):CD012004.
- Emami F, Pirouzi S, Taghizadeh S. Comparison of abdominal and lumbar muscles electromyography activity during two types of stabilization exercises. Zahedan Journal of Research in Medical Sciences. 2015;17(4):e963.
Related reading
- How to Do a Plank Properly: Form, Hold Times and Variations
- Farmer’s Carry: How to Do It and Why It Works
- Strength Training for Back Pain: How to Build a Stronger, Pain-Free Back
- A 3-Day Plan for Your Core, Your Back, and Your Confidence
- Postpartum Strength Training Program: A Safe Return to Exercise After Pregnancy
About the author: I’m Will Duru, a personal trainer and the founder of 12REPS. I hold a BSc (Hons) in Sport and Exercise Science and have more than a decade of experience coaching people in strength training.