


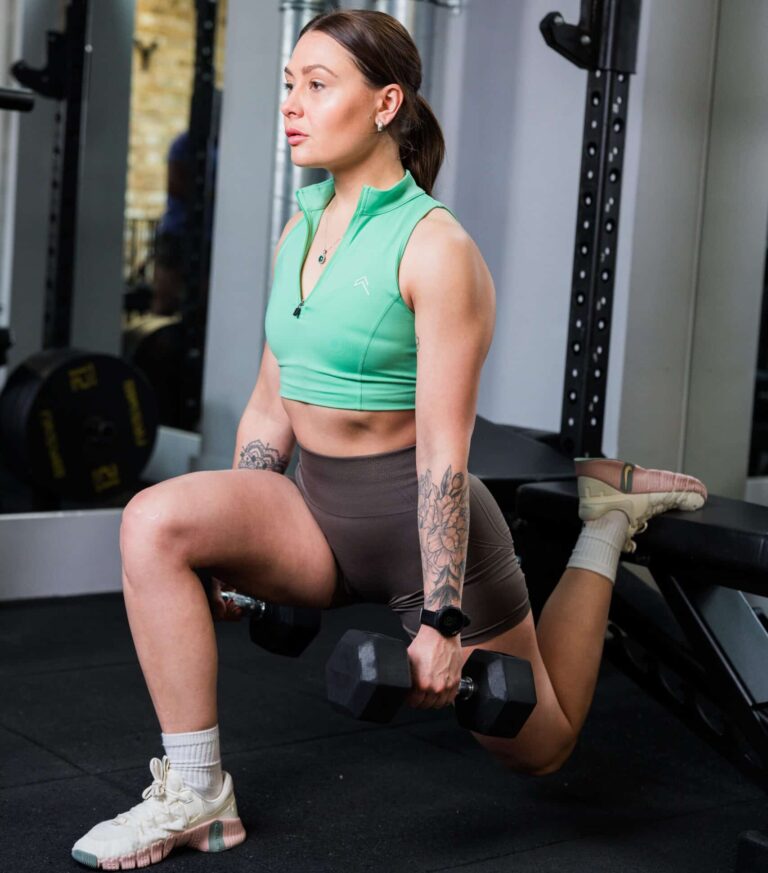
Bulgarian split squats are the exercise nobody wants to do but everyone needs to do. Ask any woman who trains seriously about Bulgarian split squats and you’ll get some variation of “I hate them” followed immediately by “but they work.”
They’re brutally hard. Your legs burn. Your balance wobbles. You feel like you might collapse mid-set. And the next day? You’ll struggle to walk down stairs without looking like you’ve aged 40 years overnight.
But here’s the thing: Bulgarian split squats build legs and glutes like almost nothing else. They expose strength imbalances you didn’t know existed. They develop single-leg stability that translates to every other lower body movement. And they’re technically demanding enough that most people do them wrong, which is why they feel even worse than they should.
I’m Will Duru, a personal trainer with over 10 years’ experience in London. I’ve programmed Bulgarian split squats for hundreds of clients. Not a single one has ever told me they enjoy them. But the ones who stick with them? They build genuinely impressive leg and glute development.
Here’s how to actually do Bulgarian split squats properly, why they’re so difficult, and how to progress without wanting to quit after every session.
Why Bulgarian Split Squats Are So Bloody Hard
Before we get into technique, let’s acknowledge what makes this exercise uniquely challenging.
It’s a unilateral movement. You’re working one leg at a time, which immediately exposes any strength differences between sides. If your right leg’s stronger than your left (most people have imbalances), you’ll know about it within one set. Your weaker leg will be struggling whilst your stronger leg handled the same weight reasonably well.
I’ve trained women who can back squat 80kg comfortably but absolutely fall apart trying to Bulgarian split squat with 12kg dumbbells. The single-leg demand is that significant.
The balance requirement is substantial. You’re essentially doing a single-leg squat whilst your rear foot is elevated behind you. This creates an inherently unstable position. Your front leg has to control the descent, manage the balance, and drive you back up. All simultaneously.
Most bilateral exercises (like regular squats) allow you to hide balance deficits. Bulgarian split squats expose them mercilessly.
The range of motion is enormous. Because your rear foot is elevated, you can descend much deeper than a regular split squat or lunge. This extended range of motion means your muscles spend more time under tension and travel through a greater stretch. Particularly your front leg’s quad and glute.
Research shows that training through a full range of motion produces superior muscle growth compared to partial reps. Bulgarian split squats force full range of motion whether you like it or not.
The metabolic demand is brutal. Large range of motion + unilateral challenge + balance requirement = your cardiovascular system working overtime. I’ve had clients whose heart rates hit 170bpm during Bulgarian split squat sets. Not during sprints. During strength training.
That’s why they’re so knackering. You’re taxing muscular endurance, cardiovascular endurance, and balance simultaneously.
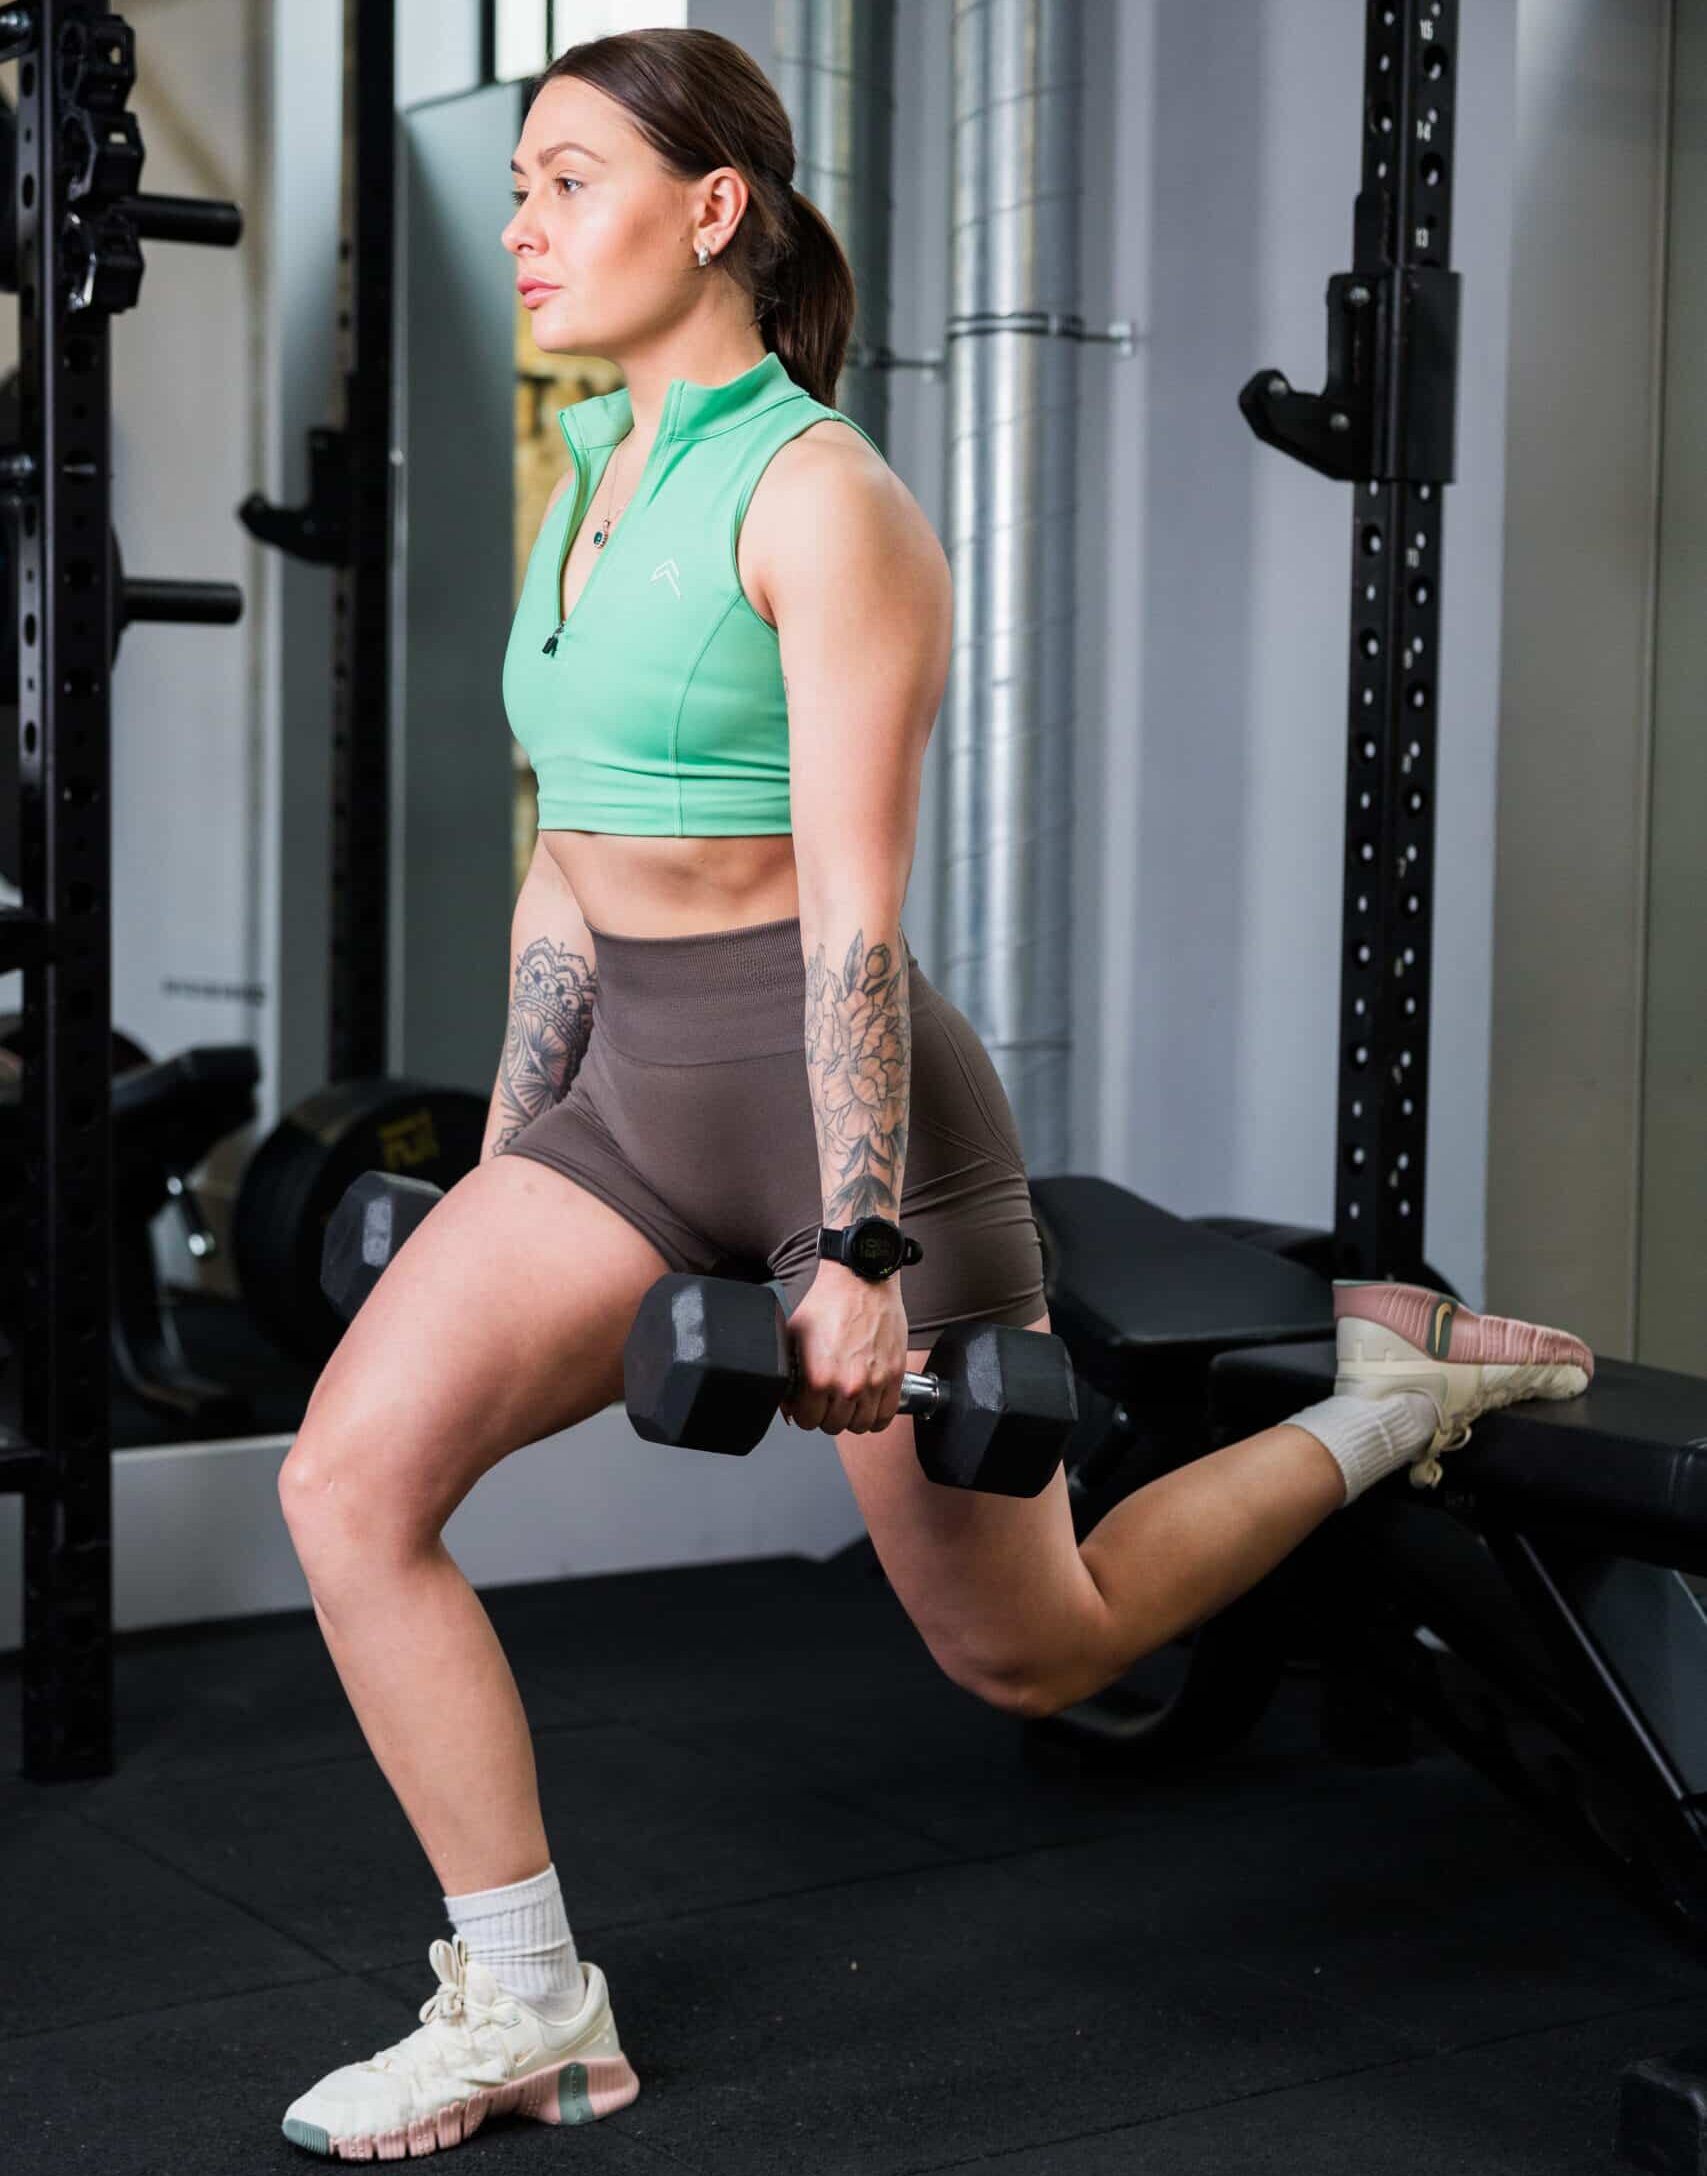
The Setup: Getting Your Positioning Right
Most Bulgarian split squat problems start with poor setup. If your positioning’s wrong, every rep will feel awful and you won’t target the right muscles effectively.
Bench Height
Use a bench or box 40-50cm high. Roughly knee height when you’re standing next to it. Standard gym benches work perfectly.
Too high (hip height): Creates excessive lower back arch, makes balance harder, shifts load to your hip flexors instead of your working leg.
Too low (ankle height): Doesn’t provide enough elevation to create the movement advantage. You might as well do regular split squats.
Knee height is the sweet spot. I make every client check this before starting. Stand next to the bench, look at where it hits your leg. If it’s around your kneecap, you’re sorted.
Foot Placement on the Bench
Place your rear foot’s laces down on the bench. Not your toes. Your entire foot top should rest flat against the bench surface.
Toes pointed into the bench (common mistake): Uncomfortable on your ankle, creates instability, makes you wobble throughout the set.
Laces down, foot flat: Stable, comfortable, allows you to focus on the working leg rather than managing ankle discomfort.
The pressure should be minimal on your rear foot. Think of it as a kickstand for balance, not a weight-bearing limb. If you’re pushing hard through your rear foot, you’re doing it wrong.
Front Foot Position
This is critical and where most people get it wrong.
Your front foot needs to be far enough forward that your shin stays roughly vertical throughout the movement. At the bottom position, your front knee should be directly above (or slightly behind) your ankle, not drifting forward over your toes.
Too close to the bench: Knee travels far forward over toes, quad-dominant, potentially uncomfortable on the knee joint.
Too far from the bench: You’ll lose balance backwards, can’t get proper depth, hamstrings take over instead of quads and glutes.
The test: Do a few bodyweight reps. At the bottom, check your shin angle. It should be close to vertical. If your knee’s way forward over your toes, move your foot further out. If you’re falling backwards, bring it slightly closer.
For most people, this means standing roughly 60-90cm from the bench before elevating your rear foot. It feels awkward initially because it’s further than people intuitively place their foot.
I had a client who insisted her foot position was fine. She felt Bulgarian split squats entirely in her quads and her knees hurt afterwards. I moved her front foot 15cm forward. Immediately, glutes activated properly and knee discomfort disappeared. Sometimes it’s that simple.
Stance Width
Your feet should maintain roughly hip-width apart laterally. Not in a single line like you’re walking a tightrope.
Single-file stance (feet in line): Unstable, wobbling side-to-side throughout the set, wasting energy managing balance instead of working your muscles.
Hip-width stance: Stable base, allows you to focus on the movement rather than fighting to stay upright.
Think railroad tracks, not tightrope.
The Movement: Proper Execution
Right, you’re set up. Rear foot on bench (laces down), front foot positioned correctly, stance hip-width. Here’s how to actually perform the movement.
Starting Position
Before descending, establish tension:
- Core braced. Pull your belly button toward your spine. This protects your lower back and keeps your torso stable.
- Chest up. Don’t collapse forward. Maintain an upright torso or slight forward lean (matching your shin angle, roughly 10-15 degrees from vertical).
- Weight distributed through entire front foot. Not just your toes, not just your heel. Whole foot pressed into the ground.
- Shoulders back and down. Maintain upper back tension throughout the set.
Most people start in a collapsed position—rounded shoulders, no core tension, weight on their toes. This guarantees the set will feel terrible and you’ll lose balance.
The Descent
Lower yourself straight down. Not forward, not backward. Straight down.
Think about dropping your hips vertically toward the floor. Your back knee travels straight down toward the ground behind your front foot.
Common mistake: “Seesawing”—shifting your weight backward as you descend, then forward as you rise. This ruins balance and makes the exercise far harder than it needs to be.
The cue that works: “Drop your back knee straight toward the floor.” This tends to produce correct vertical movement better than thinking about “squatting down.”
Descend until your back knee is roughly 5-10cm from the ground. You don’t need to touch the floor (though you can if your mobility allows). The goal is full range of motion, not floor contact.
Control the descent. Take 2-3 seconds to lower down. Crashing into the bottom position loses muscle tension and makes the concentric (upward) phase harder.
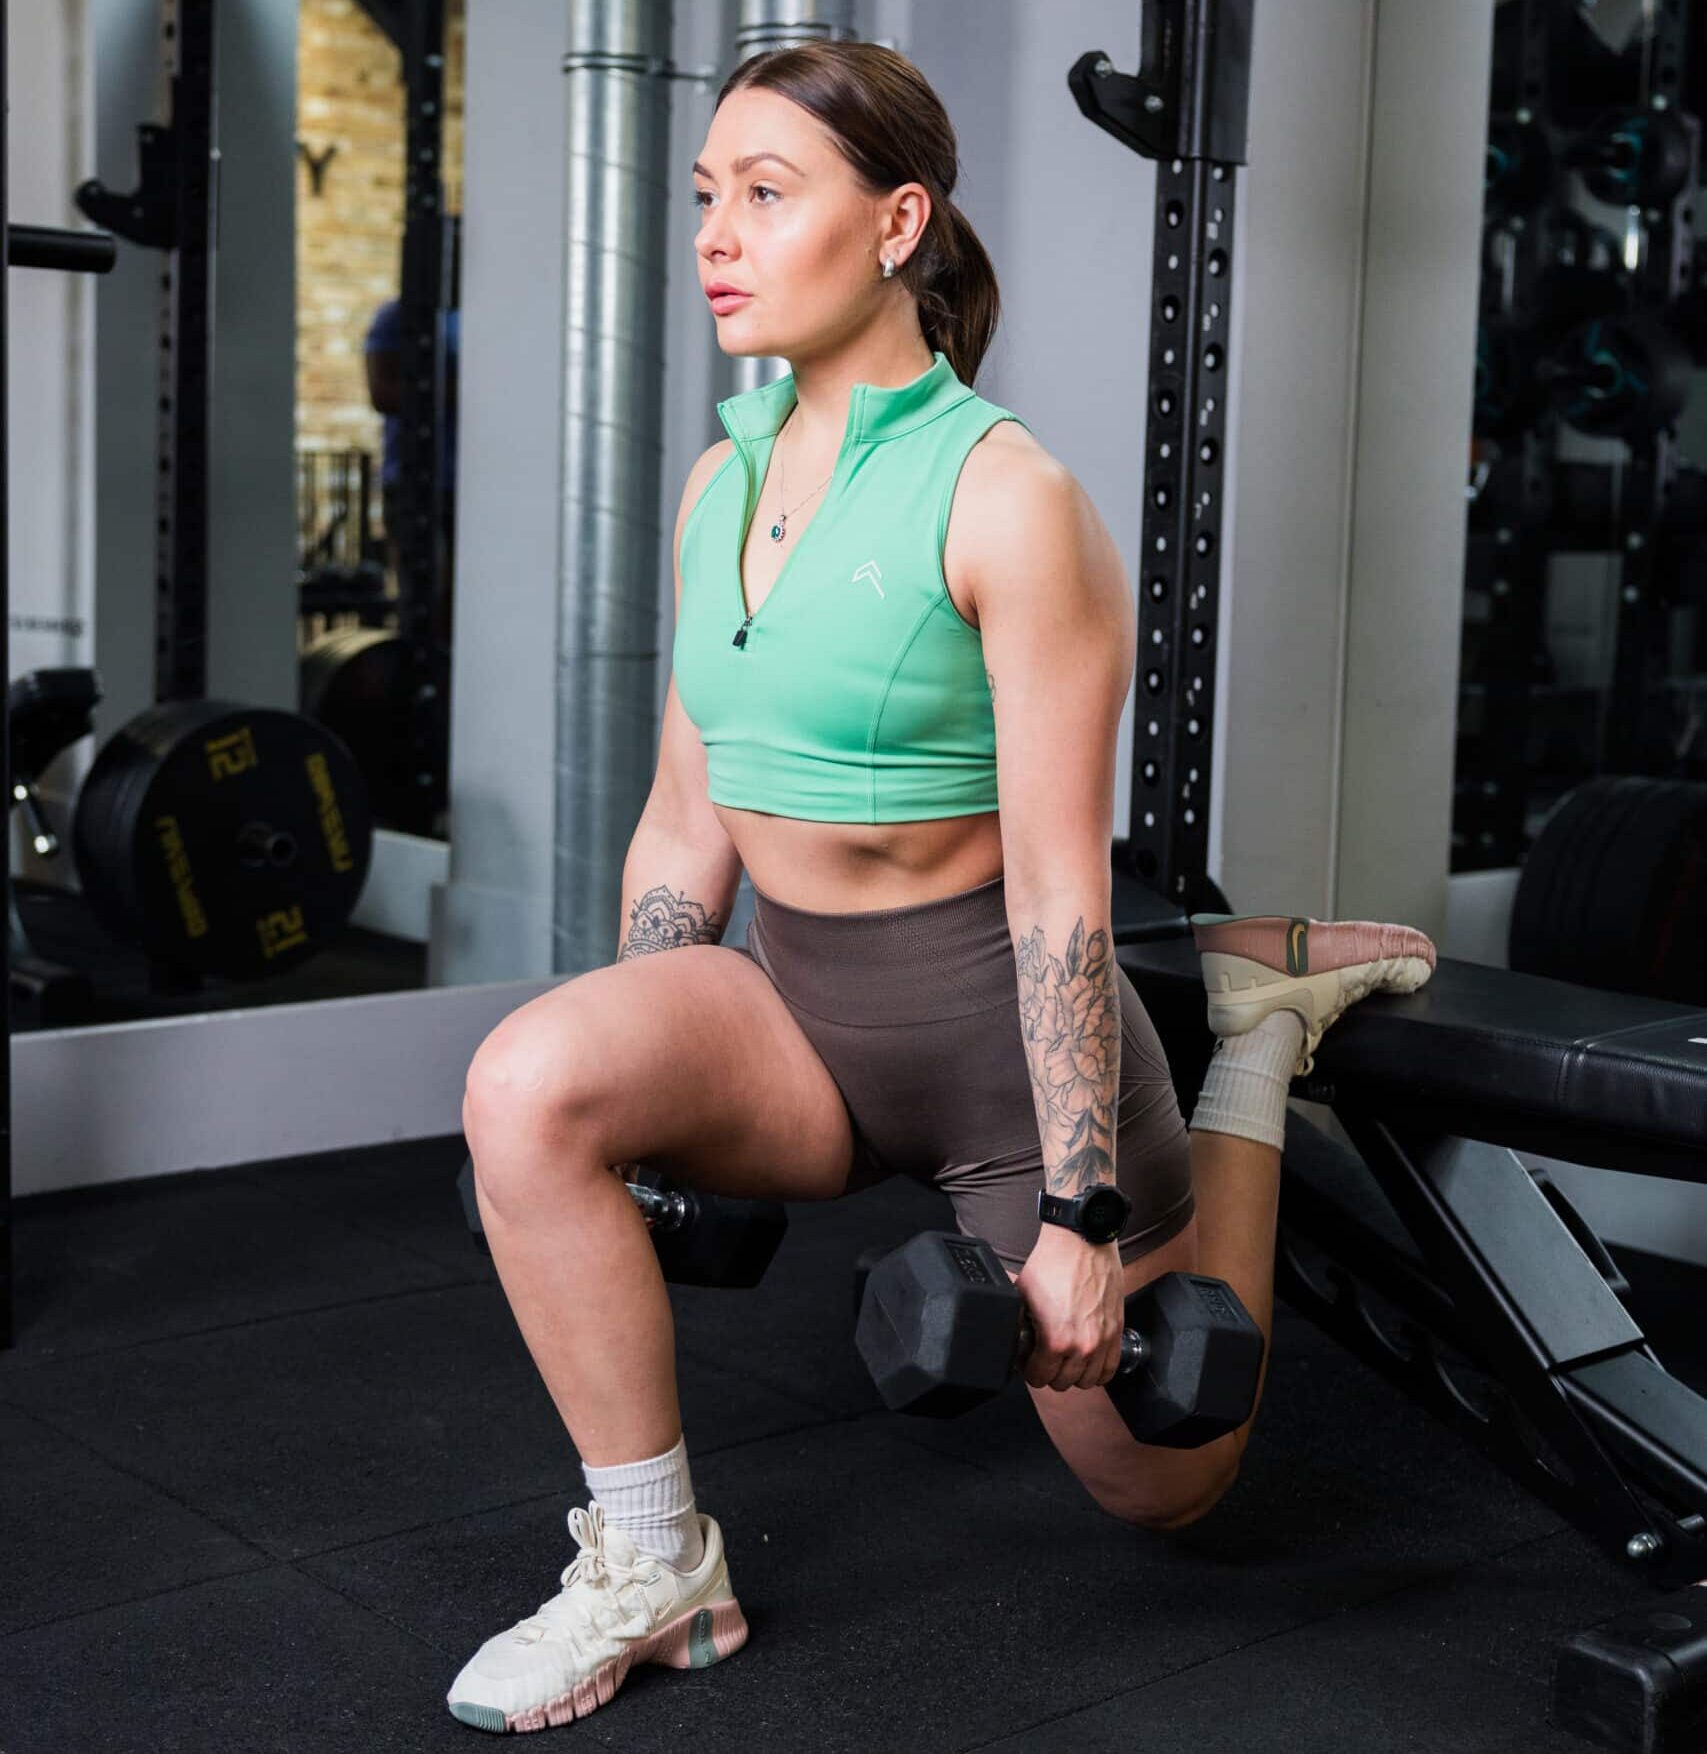
The Bottom Position
At the bottom, you should feel:
Significant stretch in your front leg. Your quad and glute should feel loaded and stretched.
Minimal pressure on your rear foot. If you’re bearing substantial weight on your back leg, adjust your technique.
Balance maintained. Not wobbling excessively. Slight movement is fine; major instability indicates setup problems.
No knee pain. If your front knee hurts, check your foot position and ensure your knee isn’t traveling excessively forward.
Pause for one second at the bottom. Don’t just bounce out of the hole. Control the position briefly, then drive upward.
The Ascent
Drive through your entire front foot—heel, midfoot, forefoot—to stand back up.
The power comes from your front leg’s quad and glute. Your rear leg provides minimal assistance. If you’re pushing hard through your rear foot to help yourself up, you’re cheating the movement.
Keep your torso angle consistent as you rise. Don’t shift forward or backward. Maintain the same forward lean (or upright position) throughout.
Think about two cues:
- “Push the floor away” with your front foot
- “Drive your hips forward” to engage your glutes
At the top, fully extend your front leg. Squeeze your glute briefly. Don’t leave reps short—complete the movement.
The ascent should take 1-2 seconds. Faster than the descent, but still controlled. Not explosive (unless you’re doing jump variations later).
Common Mistakes and How to Fix Them
Mistake 1: Knee Caving Inward
Your front knee collapses toward your midline during the movement. This is extremely common, particularly in women, and can lead to knee pain and injury over time.
Why it happens: Weak glutes (specifically gluteus medius), quad weakness, or poor movement patterns.
The fix: Actively push your knee slightly outward throughout the movement. Think about tracking your knee toward your pinky toe rather than letting it cave toward your big toe.
I use the cue “spread the floor apart with your foot” which tends to activate the right muscles. You’re not actually trying to widen your stance; you’re creating outward pressure that keeps the knee aligned.
If knee cave persists, reduce weight significantly and focus purely on control. Add banded glute activation work before Bulgarian split squats to wake up your glute medius.
Mistake 2: Rising Up on Your Toes
You come up onto the ball of your front foot as you descend or ascend.
Why it happens: Ankle mobility limitations, foot position too close to bench, or poor weight distribution.
The fix: Keep your entire front foot planted throughout the entire movement. If your heel lifts, move your foot further from the bench. Work on ankle mobility separately.
If ankle mobility is genuinely limited, temporarily use a small wedge or weight plate under your heel whilst you address the mobility issue.
Mistake 3: Torso Collapsing Forward
Your chest drops toward your front thigh as you descend.
Why it happens: Core weakness, poor setup, using too much weight, or fatigue.
The fix: Brace your core harder before each rep. Reduce weight if necessary. Film yourself from the side to see your actual torso angle.
A slight forward lean (10-20 degrees) is fine and even beneficial for glute emphasis. Collapsing forward (45+ degrees) is a problem.
Mistake 4: Using Your Back Leg to Help
You’re pushing substantially through your rear foot to assist the movement.
Why it happens: Front leg isn’t strong enough for the load you’re using, or poor understanding of the movement pattern.
The fix: Reduce weight dramatically and focus on feeling your front leg do virtually all the work. Your back leg should provide minimal assistance—just enough for balance.
If you can’t perform bodyweight Bulgarian split squats without relying heavily on your rear leg, regress to regular split squats (rear foot on floor) until you build sufficient strength.
Mistake 5: Insufficient Range of Motion
You’re not descending low enough to get the full benefit.
Why it happens: Mobility limitations, strength deficits at bottom range, or simply not understanding what full depth looks like.
The fix: Film yourself from the side. At the bottom, your back knee should be close to the ground (5-10cm away). If you’re stopping significantly higher, you’re short-changing the movement.
Work on mobility separately if needed. Use a pad or small plate as a target—when your back knee taps it, you know you’ve achieved proper depth.
Progressing Bulgarian Split Squats: From Bodyweight to Beast Mode
Let’s talk progression. This is a technically demanding movement, so don’t rush.
Weeks 1-2: Bodyweight Only
Start with pure bodyweight. No dumbbells, no barbell, nothing.
Do 3-4 sets of 8-10 reps per leg. Focus entirely on form, balance, and control.
At this stage, the movement itself provides sufficient challenge. If bodyweight feels easy on week one, you’ve probably got previous training experience with unilateral movements.
Most beginners find bodyweight Bulgarian split squats quite challenging. That’s normal.
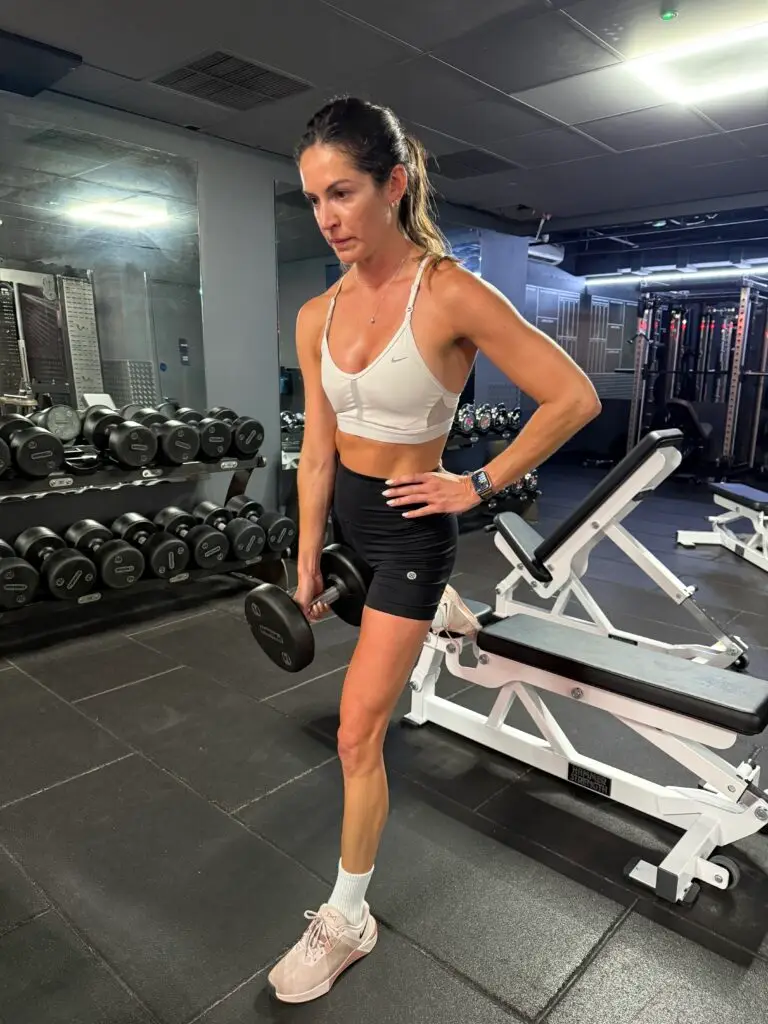
Weeks 3-4: Light Dumbbells
Add 5-8kg dumbbells (one in each hand, held at your sides).
Maintain the same rep scheme: 3-4 sets of 8-10 per leg.
This modest load shouldn’t dramatically change your balance or form. If it does, you’ve progressed too quickly. Go back to bodyweight for another week.
Weeks 5-8: Systematic Load Increases
Add 1-2kg per dumbbell each week if form remains perfect.
By week 8, many women reach 12-15kg dumbbells per hand (24-30kg total). This is solid progress for eight weeks of training.
The key: perfect form on every single rep. If form deteriorates, stay at current weight for another week.
Weeks 9-12: Into Meaningful Loading
Continue adding 1-2kg per week. By week 12, reaching 15-20kg dumbbells per hand is realistic for consistent trainees.
At this stage, you might also experiment with different loading methods:
Goblet hold: Hold a single dumbbell or kettlebell at chest height. This shifts load position, often making balance easier.
Barbell back squat position: Load a barbell across your upper back. This allows heavier loading but requires excellent balance. Only attempt this once you’re genuinely strong with dumbbells.
Months 4-6: Developing Real Strength
With continued consistent training, 20-25kg dumbbells per hand (40-50kg total external load) becomes achievable.
At this point, Bulgarian split squats genuinely challenge your legs. The soreness afterward will be substantial. The cardiovascular demand will be significant.
You might also start incorporating tempo variations:
Slow eccentric: 4-5 seconds down, 1 second up
Pause reps: 2-3 second pause at the bottom
1.5 reps: Full rep down, half rep up, back down, then full rep up (this is sadistic but effective)
The Long Game: What’s Achievable
With 6-12 months of dedicated training:
Intermediate: Bulgarian split squat with dumbbells totaling 40-60% of bodyweight (65kg woman using 13-19kg dumbbells per hand)
Advanced: Bulgarian split squat with dumbbells totaling 60-80% of bodyweight (65kg woman using 19-26kg dumbbells per hand)
Very advanced: Bulgarian split squat with barbell (bodyweight or more) for reps
I’ve trained women who can Bulgarian split squat with 30kg dumbbells per hand. It takes years. But their leg and glute development is phenomenal.

Variations for Different Goals
Deficit Bulgarian Split Squat
Elevate your front foot on a small platform (5-10cm). This increases range of motion further, making the exercise significantly harder without adding weight.
Only attempt this once you’re genuinely proficient at regular Bulgarian split squats. The increased range is no joke.
Pulse Bulgarian Split Squats
At the bottom position, perform small pulse reps (10-15cm range of motion) before standing. Usually 3-5 pulses, then full rep up.
This creates enormous metabolic stress and time under tension. Your legs will burn intensely.
Bulgarian Split Squat Jumps
Explosive variation. Descend normally, then drive upward with enough force to briefly leave the ground.
This develops power and requires excellent control. Only for advanced trainees with perfect form on standard Bulgarian split squats.
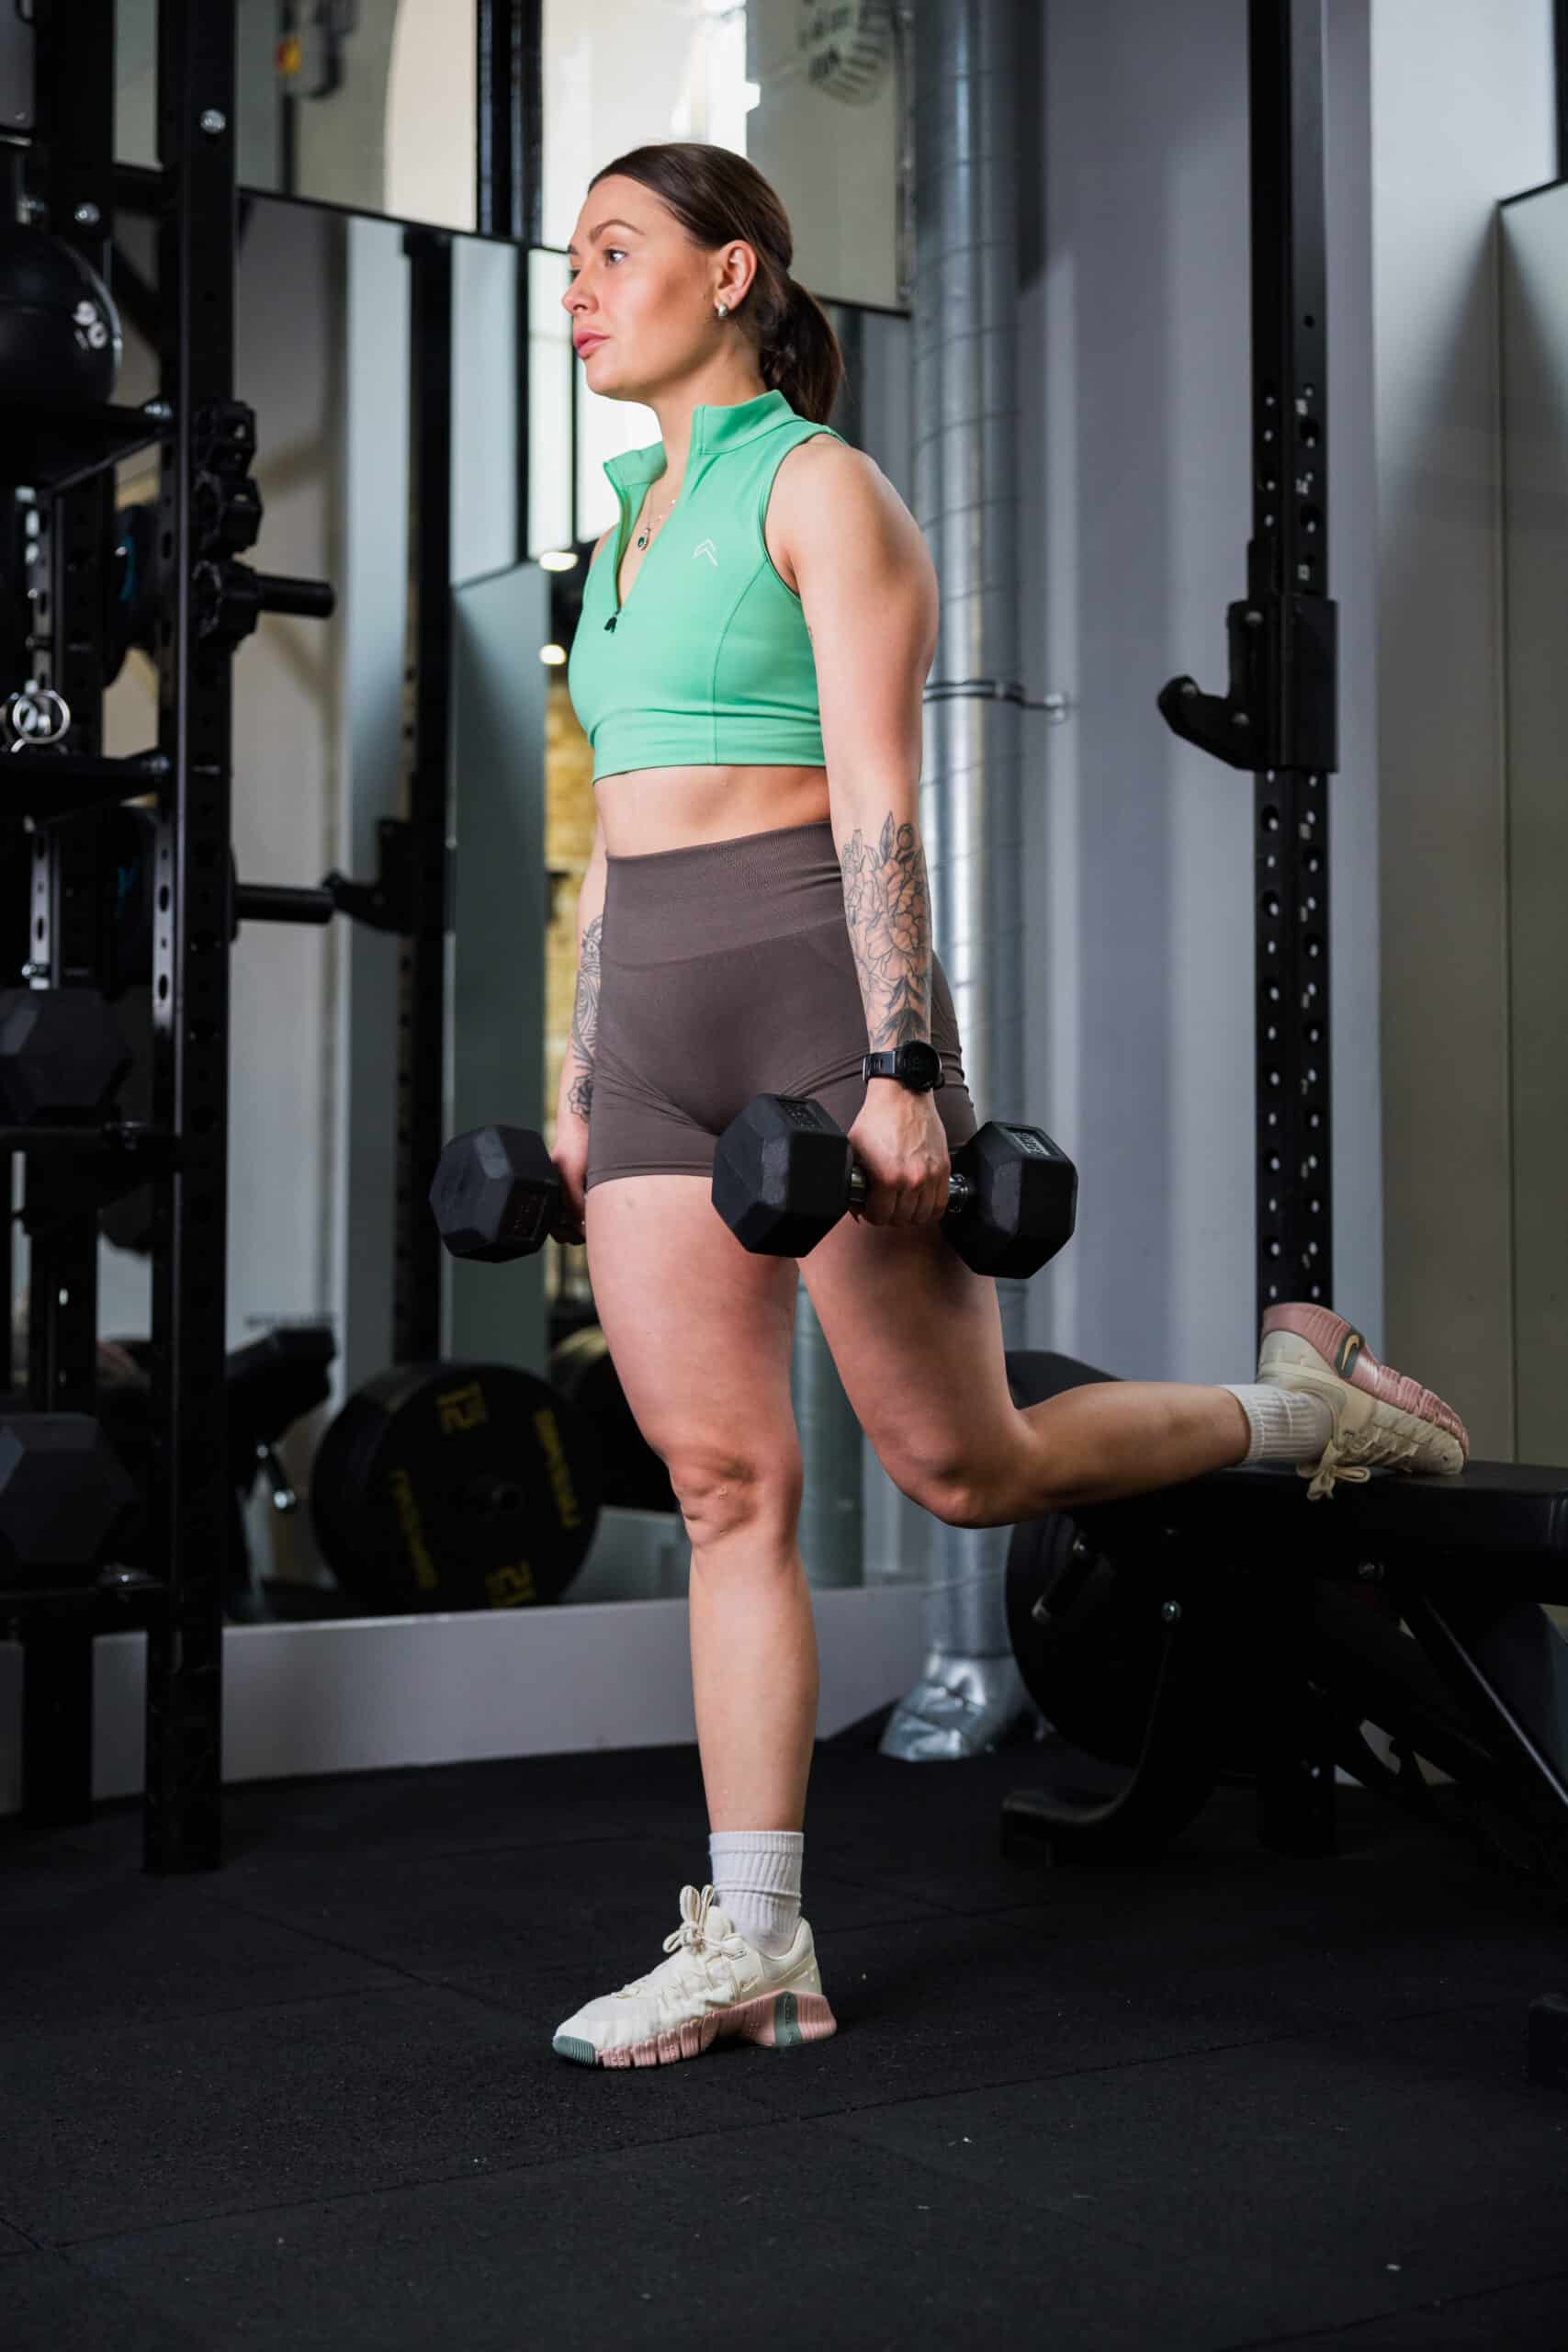
Curtsy Lunge (Alternative)
If Bulgarian split squats genuinely don’t work for you despite proper coaching and form work, curtsy lunges provide similar unilateral challenge with different balance demands.
But honestly? Most people who “can’t do” Bulgarian split squats just haven’t given them adequate time and progression. They try them once, struggle with balance, and quit.
When to Programme Bulgarian Split Squats
Bulgarian split squats work best as an accessory movement after your main compound lift in a leg session.
Sample leg workout:
- Back squat: 4 sets of 5-8 reps
- Romanian deadlift: 3 sets of 8-10 reps
- Bulgarian split squat: 3 sets of 8-10 per leg
- Leg curl: 3 sets of 12-15 reps
- Calf raise: 3 sets of 15-20 reps
Bulgarian split squats sit in the middle—after heavy bilater compounds, before isolation work. This ensures you can load them meaningfully whilst still being fresh enough for proper form.
Train them 1-2 times per week. More than that risks excessive fatigue and inadequate recovery. Less than once weekly limits progress.
They’re exhausting enough that you don’t want them every single leg session, but consistent enough that you build competency and strength.
The Gym vs Home Reality
Bulgarian split squats CAN be done at home if you have:
Dumbbells or kettlebells
A sturdy bench, chair, or box at knee height
Enough space
But they’re honestly better suited to gym training. The bench height needs to be exact, you’ll eventually want heavier dumbbells than most home setups accommodate, and the controlled environment of a gym makes balance easier.
If you’re following hybrid training (gym some days, home others), programme Bulgarian split squats for gym days. Use lunges, step-ups, or single-leg glute bridges at home instead.
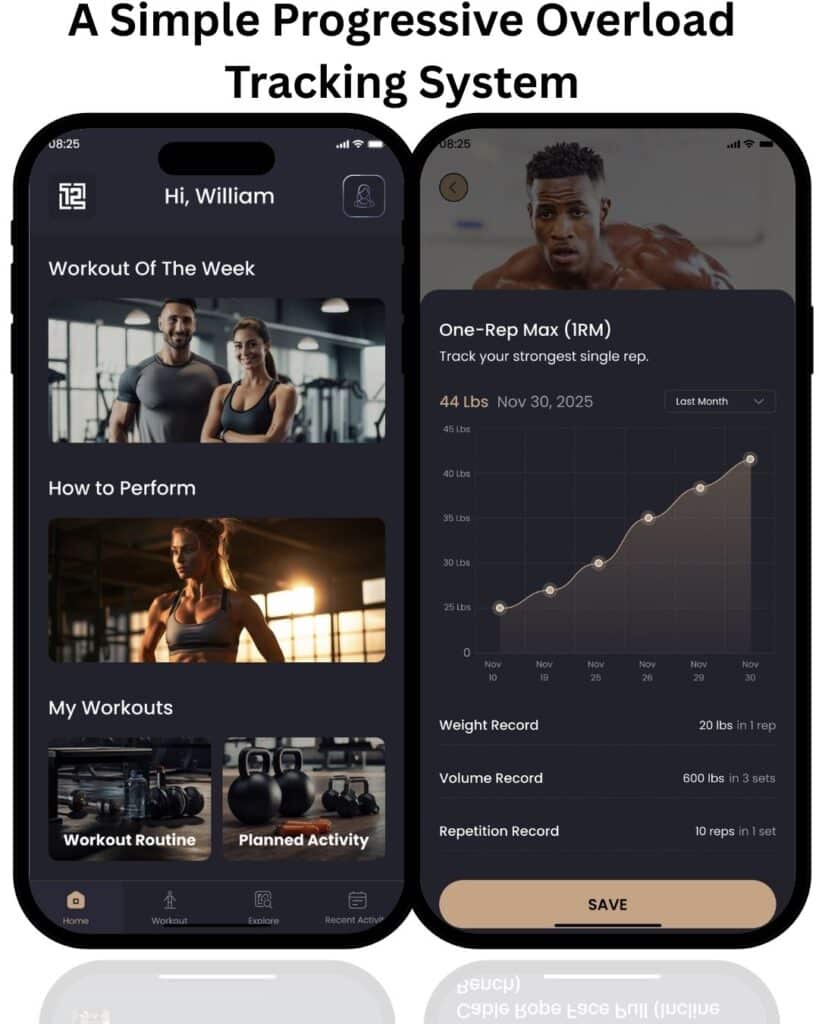
How 12REPS Handles Bulgarian Split Squat Progression
The challenge with Bulgarian split squats is they’re technically demanding whilst also requiring progressive overload. You need to:
- Track weight used per side (left leg might be weaker than right)
- Monitor balance improvements
- Manage fatigue (they’re exhausting)
- Progress systematically without ego-lifting into terrible form
12REPS manages this by treating each leg as a separate movement for tracking. When you log Bulgarian split squats, the app asks for weight used and reps completed for EACH leg individually.
This exposes imbalances immediately. If your right leg handles 15kg for 10 reps but your left leg barely manages 8 reps at the same weight, you know you’ve got a strength discrepancy.
The app then programmes accordingly—maybe suggesting slightly more volume for your weaker side, or recommending you stay at current weight for another week if imbalances are significant.
It also manages frequency intelligently. After a session with heavy Bulgarian split squats, the app won’t programme another brutal unilateral day immediately. It’ll schedule something complementary—maybe hip thrusts or deadlifts that tax your legs differently.
For movement this technically demanding, this intelligent programming removes guesswork and prevents the common mistake of progressing too aggressively.
Starting Bulgarian Split Squats: Your First Month
If you’ve never done Bulgarian split squats before, here’s your four-week introduction:
Week 1: Setup and Balance
- Spend 10 minutes finding proper bench height and foot position
- Do 3 sets of 8 bodyweight Bulgarian split squats per leg
- Rest 90 seconds between legs
- Film yourself to check form
- Expect to feel wobbly—that’s normal
Week 2: Building Control
- Same setup, quicker now (you know your positioning)
- 3 sets of 10 bodyweight reps per leg
- Rest 60-90 seconds between legs
- Focus on controlling the descent and maintaining balance
- Still filming occasionally to check form
Week 3: First Loading
- Add 6-8kg dumbbells (one per hand)
- 3 sets of 8 reps per leg
- Rest 90 seconds between legs
- Weight should feel manageable but challenging
- If balance suffers dramatically, stay at bodyweight for another week
Week 4: Establishing Progression
- Same 6-8kg dumbbells
- 3 sets of 10 reps per leg
- Rest 60-90 seconds between legs
- Last set of each leg should be genuinely hard
- If you complete all reps with solid form, you’re ready to start adding weight systematically
From here, follow the progression outlined earlier—adding small amounts of weight weekly whilst maintaining perfect form.
The Bottom Line on Bulgarian Split Squats
Nobody enjoys Bulgarian split squats. They’re hard, they’re humbling, they burn, and they make you sore.
But they work. They build legs and glutes effectively. They expose and correct imbalances. They develop single-leg strength that improves every other movement you do.
The women I’ve trained who’ve stuck with Bulgarian split squats consistently—despite hating them—have developed impressive lower body strength and aesthetics. The ones who tried them once, struggled with balance, and quit? They’re still wondering why their legs aren’t developing.
Yes, they’re technically demanding. Yes, they require patience and progressive approach. Yes, you’ll want to skip them some sessions.
Do them anyway. Start light, focus on form, progress gradually, and in six months you’ll be substantially stronger with noticeably better leg development.
And you’ll still hate them. But you’ll keep doing them because you’re not daft enough to ignore what works.
References
- Helme, M., Emmonds, S., Nicholson, G., Low, C. and Iga, J. (2022). The Effect of Rear-Foot Height on Back and Front Loaded Split-Squat Mechanics. Journal of Strength and Conditioning Research, 36(12), pp.3289-3297. https://doi.org/10.1519/JSC.0000000000004084
- DeForest, B.A., Cantrell, G.S. and Schilling, B.K. (2014). Muscle Activity in Single- vs. Double-Leg Squats. International Journal of Exercise Science, 7(4), pp.302-310. https://www.ncbi.nlm.nih.gov/pmc/articles/PMC4831430/
- Andersen, V., Fimland, M.S., Brennetvedt, Ø., Solstad, T.E.J., Shaw, M.P. and Sæther, S.A. (2018). Muscle Activation and Strength in Squat and Bulgarian Squat on Stable and Unstable Surface. International Journal of Sports Medicine, 39(11), pp.815-823. https://doi.org/10.1055/a-0648-5925
- McCurdy, K.W., O’Kelley, E., Kutz, M., Langford, G., Ernest, J. and Torres, M. (2010). Comparison of Lower Extremity EMG Between the 2-Leg Squat and Modified Single-Leg Squat in Female Athletes. Journal of Sport Rehabilitation, 19(1), pp.57-70. https://doi.org/10.1123/jsr.19.1.57
- Schoenfeld, B.J., Grgic, J., Van Every, D.W. and Plotkin, D.L. (2021). Loading Recommendations for Muscle Strength, Hypertrophy, and Local Endurance: A Re-Examination of the Repetition Continuum. Sports, 9(2), p.32. https://doi.org/10.3390/sports9020032
- Bloomquist, K., Langberg, H., Karlsen, S., Madsgaard, S., Boesen, M. and Raastad, T. (2013). Effect of Range of Motion in Heavy Load Squatting on Muscle and Tendon Adaptations. European Journal of Applied Physiology, 113(8), pp.2133-2142. https://doi.org/10.1007/s00421-013-2642-7
- Speirs, D.E., Bennett, M.A., Finn, C.V. and Turner, A.P. (2016). Unilateral vs. Bilateral Squat Training for Strength, Sprints, and Agility in Academy Rugby Players. Journal of Strength and Conditioning Research, 30(2), pp.386-392. https://doi.org/10.1519/JSC.0000000000001096
